Silicone moulds from silicone caulk is pure gold!
I have been having so much fun. Like my namesake I am a collector of shiny things, and I have a big bag of charms and trinkets that I have collected over the years with a view to making moulds out of them. With 2-part silicone putty being so pricey I put it off and put it off until I discovered this tute.
In great Blue Peter style, here is my own version. Enjoy (and try not to slice your fingers open on the mixing blade when you're washing it later like I did. Repeatedly!)

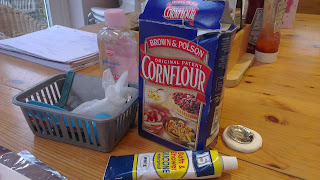
So here is my tray of trinkets. And below is my set up. I used a ceramic tile for mixing (not the best option as I will explain later), a mixing blade, cornflour (cornstarch), and 151 Silicone in white from the *gasp* pound shop! This has proved to be very economical since not only was it cheap to buy, but because it is in a metal tube I can squeeze out as much as I need and then put the cap back on. I've used the same tube three times so far and the silicone is still fine.

What I did was pretty haphazard. I squeezed out a biggish blob of silicone (looked like toothpaste but stickier), then I added roughly the same amount of cornflour and I mixed it using the blade until I got a paste. (No pics as I had silicone and flour everywhere and a brand new cameraphone ;))
Once it was thoroughly blended I added about the same amount of cornflour again and mixed it in. What I was looking for was for the silicone to become doughy enough to come away from the blade, which would mean it was ready for handling. Once it did that, (again no pics), I stuck on a latex glove and kneaded it a bit. I couldn't knead it too much as it still wanted to stick a bit to the glove, but I managed to wrestle it into a nice manageable blob (a patty, for all you Americans. We Brits, we say blob and we're happy :)).
This is where I made my first mistake. I pressed my blob down onto the ceramic tile and pressed a trinket (a pretty pendant from a local bead shop) into the mass. I smoothed the edges a bit and then very reluctantly went downstairs for a while to try to think of something else while the silicone cured.
MISTAKE! When I came back much later and came to remove the mould I found that the silicone had stuck very firmly to the ceramic. Why? Because silicone bath sealant is designed to stick very well to ceramic! Doh! Fortunately I managed to slide a tissue blade under the edge and slice it off. The mould is fine, but the ceramic tile has a residue that won't quite come off. I don't know yet if that will affect polymer clay if I use it as a work surface, but I wasn't too impressed anyway.
Still, the mould came out very well, with lots of detail. Not bad for a first go.

SECOND ATTEMPT
I learned a lot from my first go, so I decided to try again with a few modifications. This time I tried using foil as a work surface, so I could peel the backing off the mould once it had cured. This worked OK, but silicone also likes to stick to aluminium (note the second "i", Americans! ;)) and the foil tended to rip, so it wasn't my best solution.
I also tried using baby oil as a lubricant (yes for the silicone. Get your mind out of the gutter. Actually I posted a very provocative post on FB alluding to using baby oil as a lubricant and not one person rose to the bait. I was a bit disappointed to tell the truth, so go on, I'll allow you a couple of eyebrow waggles and an ooh matron. Go on. Get it off your chest.) Anyhoo, the baby oil worked well up to a point. It stopped the mould from sticking so much, but it had its downsides. It also made everything quite slippy, and it was hard to manipulate smaller moulds as they kept sliding off the foil. It also seemed to slow down the curing rate, and the moulds stayed shinier and slicker on the outside than with corn starch.
With the slower curing rate and the reduced stickiness I was able to trim the edges off larger moulds and knead them to make more moulds. The extra working time on the silicone was good, but I got carried away trimming the edges off and reusing them and ended up with at least one mould that was too thin-walled to use, so it was a false economy. See the one on the left of this pic - it is very floppy and the bottom is extremely thin, so it is hard to get a decent moulding from it. The one on the right deforms much less when I press polymer clay into it.

THIRD ATTEMPT
For the third attempt I made a couple more changes. I used baking parchment as my work surface, and extra cornflour as my lubricant. Mixing was messy because the parchment scrap I was using was way too small, but if it were sellotaped to the table or some other surface for stability I think it would be the best thing to use out of the three (ceramic tile vs foil vs baking parchment). I also liked the extra cornflour as a lubricant - I dusted it liberally all over the work surface as if I were rolling out pastry and then put my blob of kneaded mix on top. It was the messiest option, but it did mean that the silicone cured much faster (water in the cornflour acts as a catalyst, so extra cornflour means faster curing). It also meant that as soon as the moulds were firm enough I could move them onto another surface and out of the way.
I grouped my trinkets into themes, so I could do several smaller objects on one mould. Here is my Celtic batch. This one was from my third mix, and if I didn't know it had been made from caulk I wouldn't have been able to tell. It is detailed, smooth and flexible. Oh, when you're pushing in your objects to mould don't push them too hard. The triangle-shaped hole is a triquetra bead that I pushed in too deep, and it has almost come through the bottom of the silicone, making it weak.

That's enough for now. I'll post about my first go at making jewellery with them in part 2.
No comments:
Post a Comment
I welcome your comments, your humour and your support. Please remember that I and any other commenters on here are real people and play nicely. Thanks.